Meet Amanda and Nathan
We're Every Further Mile!
We love to combine local and international travel to inspire families to do the same. We've spent too much time in front of the TV and decided to make changes that allowed us to instead make memories that will last a lifetime.
JOIN US ON OUR JOURNEY!
The best place to see what we're up to is on our Youtube channel.
We get commissions from the purchases made through the links in this post. See our full disclosure for more details.
You may have heard that Pinterest is one of the best and fastest ways to get traffic to your blog (if you haven’t, let this be the first time!) and wondered if it was really true.
Well, I’m here to tell you that it absolutely is!
I’ve worked on different platforms to try to drive traffic, but none have given me traffic even close to what Pinterest now drives my way nearly as fast or as easily.
There have been many people who have written about Pinterest and their success using it, but there are a couple reasons I wanted to write this post:
- I feel like I can give hope to those who have struggled with Pinterest and getting traffic, even if you’ve tried before and failed or are just starting.
- I finally found some success and feel like celebrating by sharing with you what worked and what didn’t.
- Why not make a monster post of amazing tips!?!
So, let’s get into How I Grew My Pinterest From 3k to 340k Monthly Viewers in One Month:
HERE’S AN OVERVIEW OF THE TIPS I’LL BE SHARING BELOW:
- How to start a Pinterest business account and set it up professionally.
- How to use keywords to see what people want to read to pick blog topics.
- How to use those keywords in your boards, blog post title, pin title, and pin description.
- How to create eye catching and clickable pin images/titles.
- Plus some Pro tips along the way
But first, to be transparent: like everyone, I struggled with some significant mental blocks that I’ve had to push through, do these sound familiar…
- Impatience…I wanted to see results now!
- Overwhelm…When learning something new, my mind feels a bit like a swirling storm of jumbled mess….aka overwhelm.
- Comparison…I compared my stats with those in the game for years!
I tell you this because you are sure to hit all or some of these same walls and there is ONE thing that I believe can really help these mental blocks:
PATIENCE!
I can be a bit impatient and so when I didn’t start seeing great results after a few weeks of putting my full effort in, I began to feel discouraged.
The few weeks felt like forever to me, but now that I look back…it’s no time at all. And patience can get you really far when using Pinterest and building a blog.
With patience, we can come to recognize that Pinterest needs time to:
- Assess the quality of our content (is it good content, is it worth being put in front of their Pinterest users?).
- Figure out who is interested in our content so that they can put our content in front of the right Pinterest users. Fit us into their algorithm.
- Be confident that we are there to stay and be a consistent source of quality content. Pinterest’s #1 concern is keeping their users happy so they like fresh and clickable content.
With patience, we can also come to recognize that we need time to:
- Learn the ropes of Pinterest (what they like, your audience wants to click on, the rules of the platform, how to use it, etc).
- Allow all the information to seep in and clear a path in our brains to make it easier.
- Test everything and see what works for us, our audience, and our blog.
- Become organized in order to optimize our time in using Pinterest.
- Reach the level that others have achieved.
Recognize that everyone starts with their own foundation that either helps them or makes it more challenging:
- Time they can spend on Pinterest/their blog (occasional, part-time, full-time, are they able to afford Tailwind or are they manually pinning)
- Knowledge of blogging and Pinterest when they are starting (are they/have they taken courses that help them understand Pinterest better and more quickly than someone piecing together free resources)
- Design knowledge: Are they already good with design
- Do they have their blog established with more posts and a brand?
- Etc…
Don’t fall into the trap of comparison! Instead, look to others as mentors/inspiration. Know that one day, in your own time and way, you can achieve great things like them.
Okay…Back to my Pinterest results:
it’s been just over a month…about 6 weeks total and I’m starting to see some great results.
I think like many, I’m goal and results driven. In all of my work, I love to have goals. When I can clearly see something to achieve, then I can make plans and lists and go after it! It’s exciting to me.
When I get results, that’s what keeps me going.
So, when I had struggled to get my daily impressions above 25k, I started to feel discouraged.
This had more to do with comparison than anything. By the end of 3-4 weeks, I had already jumped from 3k to over 240k monthly viewers, but I was seeing that others were getting well beyond a million and that’s what I really wanted.
It wasn’t until I saw that others (on a Pinterest FB page) were excited about the results I was getting that I realized I was actually seeing great stats for being so new to Pinterest.
Then I got my first viral pin.
I was bouncing between 10k to 25k daily impressions (except on weekends because I still wasn’t really pinning on weekends…silly, I know…but I was just getting into the rhythm of it all).
The viral pin brought my daily impression up to 110k!
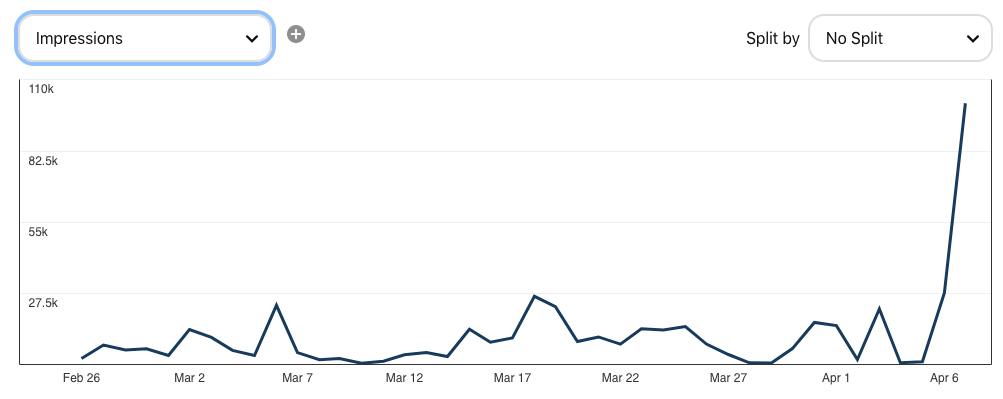
This impacted my monthly viewers and brought me up to 340k monthly viewers.
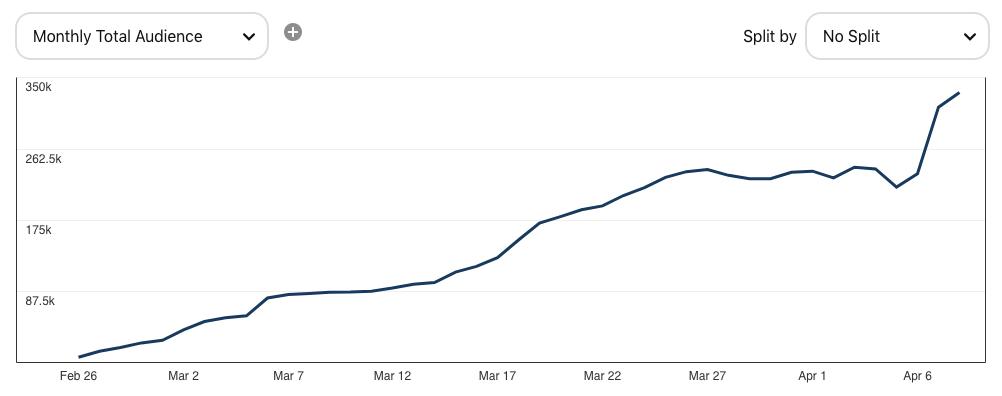
This was the boost I really needed. And I’m not about to pretend that I can do this every day just because I did it once.
But it gave me a glimpse into the fact that it COULD happen. That I CAN actually achieve this on a more regular basis once I am able to start seeing the pattern in what makes viral pins.
Once I’m able to more regularly make popular, clickable pins, then I will see big results on my website.
So, let’s break down what worked to help achieve these numbers:
1. LEARN FROM EXPERTS TO ADVANCE YOUR PINTEREST STRATEGY FAST
We all have to learn from someone, somewhere. So, look for experts that have already mastered Pinterest and learn from them!
Check out blog posts:
There are lots of people that have written about their success on Pinterest. Read lots of posts to see the pattern in what is working for lots of people. Keep track of the posts that you felt were really informative (ahem…like this one) and come back to them regularly to try out the different tips.
Start with just a few tips and work your way through them all. I promise you that you will struggle to implement all the tips in one shot. But you’ll be able to go back to those posts and glean more tips over time…as your strategy becomes more clear.
Pro tip: Check out what posts are working really well for those who are already doing well and see if you can add more value to a post that they created. Don’t copy them by any means, but see what’s working for others and create value like it, in your own words and style, and offer it to your audience.
Watch Youtube videos:
Videos really help our minds to see how to implement the tips we’re learning. The more ways our brains can absorb information the better it will be at retaining it and understanding it.
Take Courses:
This would be one thing that helped me more than anything else. It helped me take the information in stride. The course organizes all the information you need to know in easy to follow, step-by-step actions.
I took the Pinning Perfect course with Blog Clarity. They not only give you all the steps you need to grow fast, but they update the course regularly with new Pinterest strategies and algorithms. You can also be a part of their Facebook group where you get access to other Pinterest professionals.
I highly recommend this course…check it out here.
2. HOW TO CREATE A PROFESSIONAL PINTEREST ACCOUNT:
Business Account:
Set up a Business account in order for Pinterest to see that you are a professional and trust that you are sharing great content.
- In the top right corner of your Pinterest page (three dots…), click on the drop down menu and select ‘free business profile’
- Follow the prompts to create your business account.
- Migrate your boards that you absolutely want to keep (make personal ones ‘Secret Boards’….more on this below)
Proper Settings:
To continue to make your Pinterest account look professional and be taken seriously, then you’ll also want to set up your information properly.
- In the top right menu (three dots…), select ‘Edit Settings’
- Add a good picture of you. Don’t use an avatar…you want to seem personable (people trust you more)
- Display Name: Start with your name, add a vertical line and then description of what you do. (Amanda | Mindset Coach, Journal Creator & Blogger)
- Username: I use my blog name (everyfurthermile)
- About Your Profile: Describe what you do and use keywords if possible (you have very limited characters to use). Add a link to your website. (For example: It’s time to take charge of your mindset! Break down those limiting beliefs and finally achieve a life of freedom! www.everyfurthermile.com)
3. HOW TO FIND HIGH PERFORMING KEYWORDS:
I have talked about this before in my Pinterest SEO blog post…but want to go over it again here to make sure you get all the most relevant information.
It’s important to understand keywords before we talk about boards and pins.
First, Pinterest is a search engine. Sure, people will come on to browse the pins, but also to use the search bar to find the content they really want to learn about.
If you want your audience to find your pins, then you will need to know what words they are using in their search (aka keywords). Once you know what they are searching for, you can use these keywords in your boards and pins to make sure they find your information.
How to Find Keywords:
There are 3 major ways to find good keywords on Pinterest:
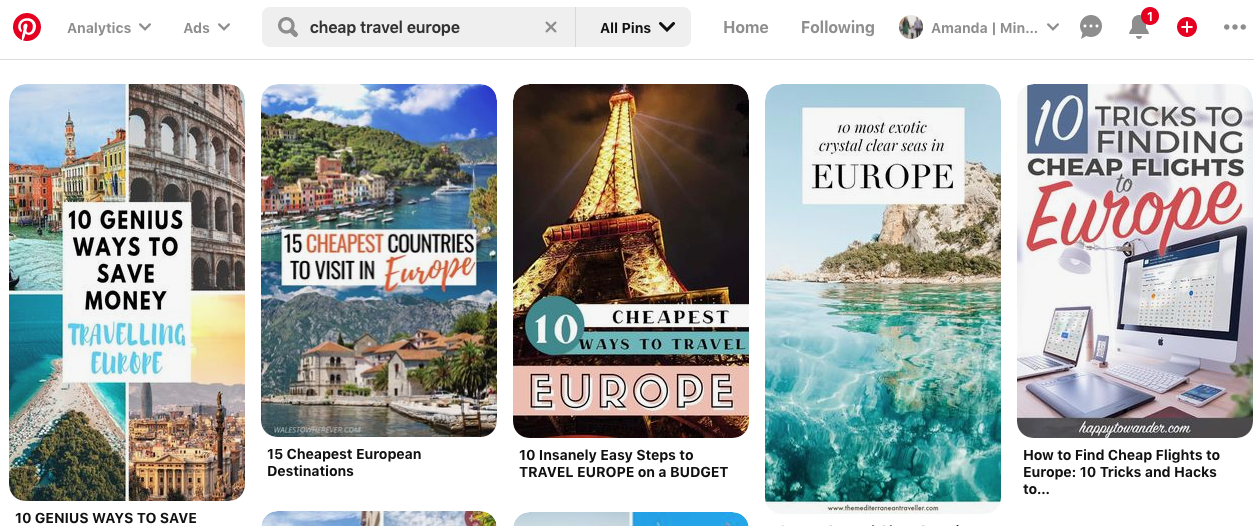
a. Drop Down Search Bar:
When you start typing in the search bar, you’ll see suggestions pop up. These suggestions are the most used search terms and best for finding keywords. For example, let’s say someone is looking for ways to travel to Europe on a tight budget. Here are some suggestions from Pinterest (this took me 1 minute to search…not hard at all!):
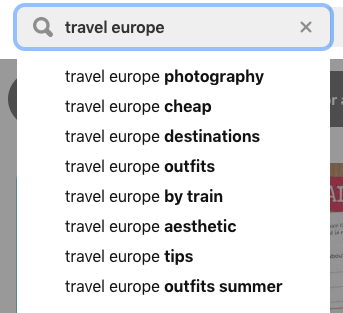
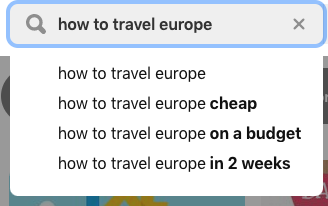
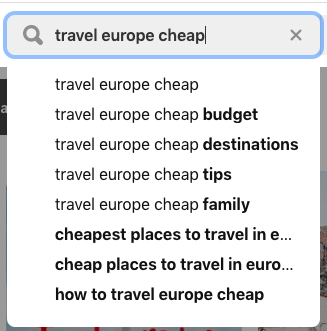
So, from this you can see that some great keywords would be:
Travel Europe Cheap, Travel Europe Tips, Travel Europe Cheap Budget…Destinations…Tips…Family. Cheapest Places to Travel in Europe, Cheap Places to Travel in Europe, How to Travel Europe Cheap…on a Budget.
b. Use the pop up bubbles (below the search bar) to help you get more keywords:

c. Look at the top pins and see how they are ranking. (What does their image look like? What is the title? How did they write their pin description?)
You can use keywords like this in your boards or pin descriptions to help your audience find your pin/post. (More on this with examples below)
Pro tip: Not sure what your next blog post should be? Start with keywords. If you want to write a post you KNOW your audience is looking for, then find out what they’ve been searching for first, then write a post around it.
4. HOW TO CREATE HIGH PERFORMING PINTEREST BOARDS
When you create your boards start with about 15- 20 and make more if you find the need, then use keywords in the titles. Only have public boards that connect with your blog topic/audience.
Create Secret boards to be able to pin some of your personal favourite topics. Secret boards allow you to save pins and not show it to anyone. When creating the board, simply click the tag that says ‘keep this board secret’.
Pro tip: Use Secret boards to also save pins that inspire you in your business (branding ideas, great titles, etc).
Titles:
You’ll add one board with your blog/website name where you will pin only your pins, then have other boards that have titles that work with the topics that go with your blog (For example, as a travel blogger you may have boards for Cheap Travel, Travel Quotes, Travel Europe, Travel Asia, etc).
Pro tip: Niche down your board titles. For example, Cheap Travel UK, Winter Travel Gear, etc.
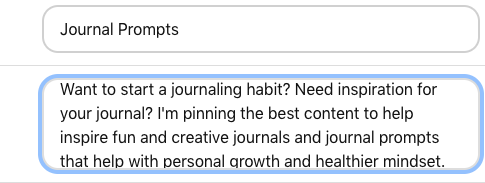
Descriptions:
Make sure you add a description to each board. It may seem tedious (when setting anything up at the beginning, this can be true), but it’s worth it in the long run.
If you have a board description that uses lots of great keywords, then it will help boost the pins that you add to that board when people are searching for those terms.
This is why niching down helps. If you can niche your boards and use these niche keywords, then you will get the traffic over the generalized boards.
Make sure to keep the description conversational and not just jammed with a bunch of keywords. Like this:
5. HOW TO CREATE HIGH PERFORMING PINS ON PINTEREST:
Style:
Your image should be the correct size (735px X 1102px), eye-catching, relevant to your topic, simple with an easy-to-read title, and branded for your blog. You are able to use long Pinterest images as well, but use sparingly (735px X 1500-2000px).
Images:
Use images that are bold and warmer. I’ve heard that faces don’t work as well as images without faces, but I’m not really finding this myself. So, I continue to test both. (Partly because I know that images with happy faces do better on FB, but this could prove wrong on Pinterest).
Add your website url and/or your logo to every pin image. Images are important, but the titles are even more important.
I use the free program Canva to create my pins. This combined with free image websites (unsplash, pexels, pixabay) allow anyone to create images for free easily.
Title:
When you are done creating a beautiful Pinterest image, then make sure you title it with your keyword. The way that Pinterest connects your image with your search is through the title of your image. Make your title bold and very easy to read.
Also, make it a clickable title. There are 3 major title styles that seem to work best:
- How to ________ in # days/weeks/months
- How I Got ____(result)____ in __X___ (time) by _______
- 8+ Ways to ________ Even If You’re New to _______
(Sometimes you can start with a question to grab attention and follow up with # of tips. This is what helped my viral pin.)
Pro tip: Go beyond the title and give them additional offers. For example, 8 Benefits of Women Who Journal Regularly (+ A FREE Printable Journal) – Bonus… you can use this to build your email list.
Pin Image on Website:
Be sure to add your Pinterest image to your blog, this does 2 things. It allows those who are reading your blog to have a Pinterest image to pin (because you want an image designed for Pinterest to be pinned, not your blog title image). It allows you to add an ‘alt tag’…
Alt Tag:
When you load your image to your blog, be sure to add keywords to the alt tag section (it’s basically naming the image on your website the same as the keywords you used in the title). This is important for your blog and your pin. This is one more way for Pinterest to connect your blog’s content with what your audience is searching.
Descriptions:
Like your board description, you will use your keywords to write a conversational description of the pin. (Use hashtags if you like. They can be helpful)
You have about 500 characters for the description, so keep your wordiness down and your keywords up.
For example:
Pin Title: 8 Genius Ways to Travel Europe Cheap (+ a FREE Downloadable Budget Sheet)
Pin Description: Been dreaming of traveling Europe, but have a tight travel budget? Learn how to travel Europe cheap with these tips that will get you to all the cheapest places to travel in Europe. Check out this post on How to Travel Europe Cheap. Travel Europe Tips | Travel Europe Cheap Budget | How to Travel Europe Cheap on a Budget
#TravelEurope #CheapEuropeTravel #TravelTips
Rich Pins:
Sign up for Rich Pins with your Pinterest for Business account. Rich pins change the way your pin looks in the feed. Your business name shows up below the image and your title is bolded. It also indicates to Pinterest that you are a serious blogger and they will reward your pins for this.
Here’s a video (not my own) that shows you how to set up Rich Pins easily.
6. TEST, TEST, TEST:
My final tip that I think is hard for many (it was for me) is to test, test, test your pins. It’s the ONLY way to really see what works and doesn’t. Sure, you’ll feel like some of the pins were a waste of time, but they weren’t. If they didn’t get you much traffic, then test different aspects:
- Same title, different image
- Different title, same image
- Same title, different style
If it did do well, then test that style with different blog posts.
7. Use Tailwind (**UPDATED**)
I’m new to Tailwind, so I can’t speak to all the functions yet. I started as a manual pinner. This was taking me 40-60 min A DAY to get my 20ish pins on Pinterest.
I was getting really sick of using so much time (I don’t have much when taking care of 2 boys and trying to keep up with blog posts…may I right?!?). So I gave in to using Tailwind.
Tailwind is the best $100 I ever spent!
I went from 40-60 min A DAY of manual pinning to 30 min once to pin for 2 weeks (and I’m 100% certain I will get a lot faster at it once I’m Tailwind savvy).
Not only that, but the other feature I loved is that is spread out the pins over the day at the best times of the day to pin. This helped my posts look less like spam. Seriously…if you’re stressed at all about the time spent on pinning, then use Tailwind.
You can sign up here.
However, if you plan to take the Pinning Perfect course (which has so much more great info than what I’m sharing here…including stellar ways to reduce time spent on creating blog content) then they have a $30 off coupon right now to use. Taking you from $120/yr for Tailwind to $90/yr. It’s great!
Put together Pinning Perfect and Tailwind and you’ve got yourself a WINNING combination! Depending on the work you put into these, you could cut down the time before making money by months!
WHAT I’M NOT GOING TO TALK ABOUT TODAY:
Group Boards/Tailwind Tribes:
I’m so new to Tailwind that I can’t speak to Tailwind Tribes at this time. I do see that they hold tons of value and will be diving into this soon.
While group boards used to be a big deal on Pinterest, they have been knocked to the backburner because they had actually been too powerful. Pinterest wanted group boards to be a space for people to share resources, not to be a powerful boost of content on the main feed. So, they have stifled the reshares. Because of this, I haven’t spent a lot of time trying to get into group boards or pinning to them.
I’ve read about this on other blogger’s posts as well.
In fact, I’ve read from others that they had been big into group boards, then changed up their strategy because their stats had become stagnant. They stopped putting so much effort into group boards, instead pinning more to their own boards, and saw their website pageviews soar.
I also watched a video where the blogger/vlogger tried to up their Pinterest traffic by using double the groups she was already using and it basically didn’t show much results at all.
Keep an eye on this though since Pinterest likes to change things regularly.
To Sum Up…
If you want a good chance of creating a viral pin and build up your monthly viewers, you’ll:
- Have a Business account and set it up professionally.
- Search keywords to see what people want to read and write about that.
- Use those keywords in your boards, blog post title, pin title, and pin description.
- Create eye catching and clickable Rich pin images/titles.
- Save time by creating processes (docs, templates)
- Test! Please test…for the love of your business…test!
Finally…Write great content on your blog that keeps them on your website and offers them great value. (I have a post about this here)
I know this was A LOT of information to digest, but I hope you can take this information and see big results in your own Pinterest Strategy. Make sure you pin this post and share it with others (sharing is caring!)…
Want to fast track your Pinterest growth? Grab our Pinterest Starter Kit! Get 22 Pin templates (15 regular and 7 long) and Our 6-Step Starter Pin Strategy. Bonus: 250 Pinterest Keywords List for Top 5 Categories
Popular Posts
One of best ways to make money online is through affiliate marketing, which is simply the art of advertising for others throughout your blog (we teach about this on our website). We use affiliate links on this website directing you to products and deals that we believe are great. They may not be perfect for you and there may be outdated information, so keep an eye on what you click on! Let us know if you have any questions.